John Betts - Fine Minerals > Home Page > Educational Articles |
by John H. Betts, All Rights Reserved
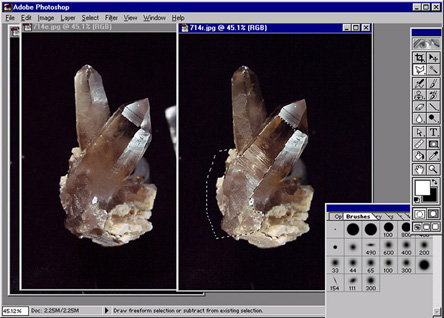
An area from one photo is selected using the lasso tool, then it is copied onto the other image, finally the two are merged together. (See Figure 5.) The Photoshop manual has an excellent tutorial on this common technique.
Another common problem when photographing minerals is getting adequate reflections off of all desired crystals. Taking several images with various light position will give a variety of reflections. Combining various parts of these images into a single image will give a final effect that better describes the specimen. This is not artificially enhancing the specimen image, it is overcoming lighting limitations to capture an honest description.
|
|
|
|
|
Figure 5. A. two different images of the same specimen as seen in Photoshop. The left version has good reflections on the termination and the rear crystal. The right version has a better reflection off the central face of the front crystal. Using Photoshop’s editing tools the central face on the right crystal is selected (dotted line) and copied onto the left photo. B. The composite image after copying the reflection onto the image. C. The final photo after retouching. |
Conclusion
Digital photography is not very difficult, in spite of the intimidating nomenclature and unfamiliar tools. More control than ever is directly in the hands of the photographer and the creative potential is enormous. When learning to use digital cameras and software, start with your best specimen available, and shoot it 20 different ways. It is easier to take a great photograph of a good specimen. Try to copy the style of an image in a magazine or on the web to emulate the lighting or background.
No single article can teach all the steps of making digital mineral photographs. Similarly, observing an expert only illuminates the techniques used, but does not teach an individual to make good images. Only practice can teach when and how to use various techniques.
References
Horder, Alan (1971) The Manual of Photography. Focal Press, London.
Scovil, Jeffrey (1984) Mineral Photography: Basics and a Different Approach. Rocks & Minerals, Volume 59, No. 6, p. 272-277.
Scovil, Jeffrey (1986) Mineral Photography: Equipment and Vibration. Rocks & Minerals, Volume 61, No. 2, p. 70-73.
Scovil, Jeffrey (1987) Mineral Photography: Film and Lights. Rocks & Minerals, Volume 62, No. 4, p. 258-262.
Scovil, Jeffrey (1988) Mineral Photography: Lights and Metering. Rocks & Minerals, Volume 63, No. 6, p. 473-477.
Scovil, Jeffrey (1990) Mineral Photography: Beyond the Specimen - A Look at Backgrounds. Rocks & Minerals, Volume 65, No. 5, p. 421-424.
Scovil, Jeffrey (1996) Photographing Minerals, Fossils & Lapidary Materials. Geoscience Press, Tucson.
Wilson, Wendell (1987) A photographer's guide to taking mineral specimen photographs for the Mineralogical Record. Mineralogical Record, Volume 18, No. 3, p. 229.
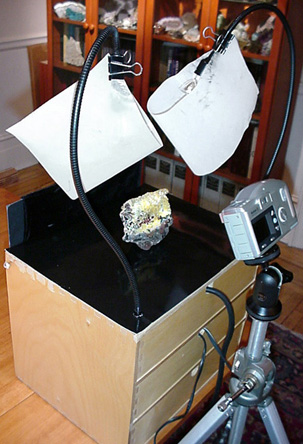
Author’s Equipment· Sony MVC FD-83 digital camera. Captures 1024 x 768 pixel images in native mode, focuses to 1 cm, stores images on common floppy disks. 8-12 images per disk depending on image/subject. · Two 50 watt / flood SoLux 4700º halogen bulbs for illumination with frosted mylar diffusers over the bulbs · Minerals are photographed on black glass or white backgrounds. · The images are cropped, cleaned up, and optimized in Adobe Photoshop 5.0. · Computer: Dell XPi CD 166 MHz with 48 MB RAM · Iomega Zipdrive for storing images. Each disk is capable of storing 100 MB of images. · Epson Stylus 800 color inkjet printer prints at 1440 DPI though regularly used at 720 DPI.
|
|
Figure 7. The author’s photography setup. Flexible arm lights were adapted from track lighting fixtures and mounted to a small chest of drawers. This elevates the specimen off the table top to a good working height to avoid back discomfort during prolonged photo sessions. Each SoLux bulb is covered with frosted Mylar diffusers. The top drawer contains the transformer for the lights. The middle drawer is for the AC power adapter and camera storage. The bottom drawer hold props, diffusers, and computer disks. The top of the case is covered with gloss black laminate. Note the typical tripod pan head has been replaced with a universal ball mount to simplify camera angle adjustment. |
| Follow up:
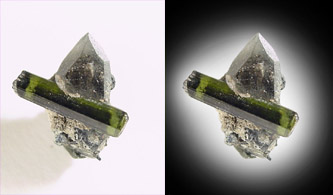
Occasionally emails are received asking how I get the backlighting in my photographs. More disconcerting are the complaints that is is wrong to backlight the specimens because they are never illuminated that way when displayed. I would like to clarify the misunderstanding: My photos are not backlit or rear illuminated. My photos are vignetted. I like the look of borderless galleries, where it is hard to tell where the photo ends. Because my page backgrounds are solid black I vignette the photos to fade them to black around the edges. See the example below.
The raw image on the left was taken on a plain white background. I find this is best to illustrate translucency in crystals. The final image on the right has the background vignetted to black around the edges. If you look at the mineral portion of the photograph you will find no difference. So another of my secrets has been revealed. I welcome viewer comments on whether this technique is misleading. I do it so the web pages look nice. If the web pages had a white background then my technique would change.
|
| More Follow up:
I welcome questions from beginning mineral photographers, and freely share my tools and techniques. The most common question I get is, "How many megapixels is your camera." I smile. As a camera designer, I created conventional and digital cameras for Polaroid and Kodak. I had to work with marketing people that were always trying to one-up the competition and therefore were always trying to boost the performance statistics of the cameras. Their favorite statistic to tout is "megapixel resolution" of the cameras. As a result of this emphasis on performance statistics, buyers focus on them too. Plus, buyers are often confused by the vast array of variables in features versus cost of the many digital cameras on the market. Simple, measurable statistics like pixel count, make objective decision-making simpler. So everybody uses them to compare cameras. In fact, camera features like close-up focus, spot metering, white balance control, etc. are much more important than pixel count at creating quality images. The other reason I get a giggle out of the question of megapixels is that my images are ridiculously low resolution. On average, the mineral images on this site are around 400 x 350 pixels. That equals 1/7 of a megapixel. If larger images were used it would take forever for the images to download through the Internet. Using a 3 megapixel camera to create my images would be overkill. Instead I use a camera that captures a 1024 x 768 pixel image. That equals .7 megapixel. For web images that is all you need. Lastly, your photo technique contributes more to quality images than your camera. The saying, "It's not the tools, it's the carpenter" sums up why some photographers can create beautiful images with simple cameras. John Betts, 4/30/2002 |
Equipment Update 12/9/2014
After 9 years I recently upgraded my camera. I've worn out 3 of my Nikon Coolpix 4500 over the years shooting over 1.5 million initial images that were edited down to 85,000 final images. In many ways the Nikon Coolpix 4500 is still the perfect camera for taking Internet-resolution photographs. It was not the best or the highest resolution or highest ISO. But it had a small lens that allowed getting close to a small diamond crystals AND still get light in from the side to illuminate the diamond. And it had an LCD viewfinder that was independent of the lens allowing viewing the image while standing above, with the camera was at waist level. Lastly, the resolution was more than adequate for my needs.
My new camera is the Nikon Coolpix P7700 (below) which is higher resolution and higher ISO than my old camera and it also has an independent LCD viewfinder.
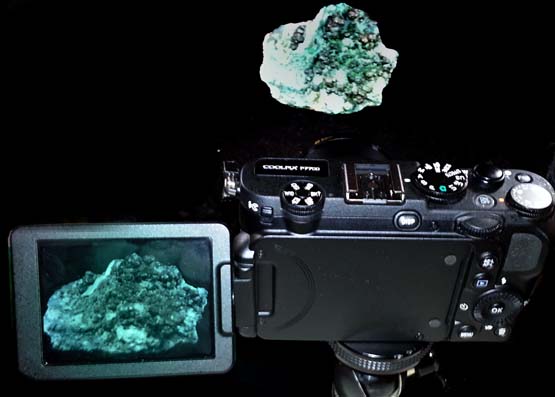
The Nikon Coolpix P7700 has a macro mode and you can look at my New Listings week to see it has no problem with close-ups of small items.
When selecting a camera I rejected the Nikon S9700 and P330 because it does not have a fold-out LCD viewfinder which I consider ESSENTIAL. A fold-out LCD viewfinder allows me to stand upright and frame the photo while the camera and mineral are at about waist level. I once got terrible back spasms after a weekend of photographing minerals when I first started my site 18 years ago. The pain was from bending over for three days straight. Ever since I insist of a pivoting LCD viewfinder.
The other camera considered, a Nikon P600, has a folding viewfinder, but there is no need for it's SLR viewfinder which is for scenic photography. Remember, I was a camera designer for Kodak and Polaroid for 25 years and I do not believe in paying for features that are never used.
I purchased a P7700 on Ebay for $250 with 4 GB card. I then added an AC adapter for long photo sessions.
The camera performs perfectly. No processing delay. No complaints. After photographing about 400 specimens I now have optimized the camera settings. Yesterday I resolved my issue with photographing under UV illumination.
The Nikon Coolpix P7700 is not a camera for all uses. I was specifically looking for a camera for photographing minerals which meant I needed macro mode, aperture priority mode, precise white balance control, ease of adjusting exposure quickly, and the fold-out LCD viewfinder mentioned above. I do not care about zoom range, panorama, movies, action modes. I am only photographing minerals and for that purpose the Nikon Coolpix P7700 is perfectly suited.
For those looking to upgrade their camera I highly recommend the Nikon Coolpix P7700. Note: the model was recently replaced by the Nikon Coolpix P7800 which has the addition of an optical viewfinder too (which is of no use for shooting mineral photos. So save your money and buy a used or refurbished Coolpix 7700 on Ebay.
Mr. Betts, an avid mineral collector, is a product design consultant living in New York City. He has designed slide scanners, instant cameras, 35-mm cameras and digital cameras for both Polaroid and Eastman Kodak as well as infrared thermal imaging cameras for Inframetrics. As a photographer, he has photographed thousands of mineral specimens using Kodak, Nikon and Sony digital cameras, using several different models of each brand over the years. A gallery of his mineral photographs can be found on the Internet at: http://www.johnbetts-fineminerals.com/jhbnyc/bestgall.htm
© John H. Betts - All Rights
Reserved

Please support our sponsor

© John H. Betts - All Rights Reserved
 5a.
5a.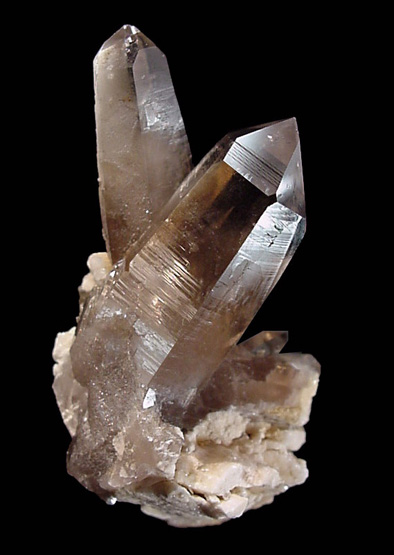 5b.
5b.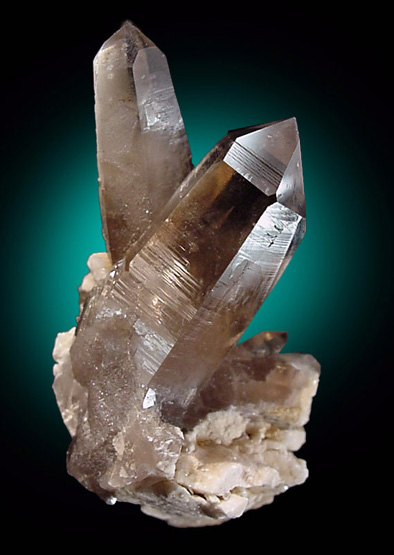 5c.
5c.