John Betts - Fine Minerals > Home Page> Educational Articles > Mineral Collecting Tools |
by John Betts, All Rights Reserved
1. Altimeter Watch
2. Internal Frame Backpack
3. CoolMax T-shirts
4. Citronella Candle in a Pail
5. Polarized Sunglasses
6. Carbide-Tipped Hand Point Chisels
7. Heavy Duty Paint Brush
8. Short Handle Sledge Hammer
9. Pocket Tools
10. Makita Portable Diamond Saw
Very often beginning field collectors come up to me and ask "I am new to collecting, I have a geologist’s pick, what other tools should I get?" This article is meant to answer that question and report about some new products available that are useful to field collectors.
Let me start with what you should do with you a geologist’s pick. It is not for mineral collecting. It’s only purpose, in relation to field collecting minerals, is for placing in photographs for the purpose of scale. That is all geologists use them for. They also use them to chip off small chunks of rock, exposing a fresh surface for inspection under a loupe. But unless you only want to collect small chips of rock, they are little use when mineral collecting.
If you are going to use them for scale in your photographs, make sure you get the smallest one available. This has the effect of making the subject matter of your photograph look even larger. I have often wanted a miniature version, about 4" long, so I could prop it in a pocket of crystals and make the pocket look enormous.
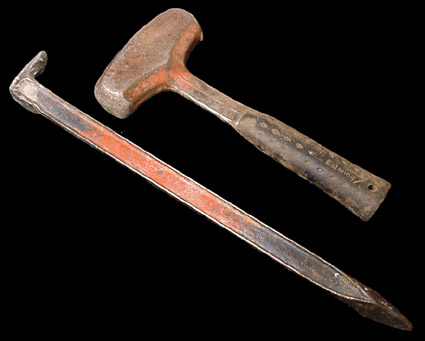
When the beginners ask me the question about gear they need, they are really looking for tool suggestions. The Estwing prybar and crack hammer are the two most essential tools that go with me on every trip, no matter how casual.
The crack hammer is available in 3 or 4 pound versions. Get the heaviest hammer you can comfortably use all day, without becoming overly fatigued. Remember, there is a correlation between the size of hammer and the size of specimens you will collect. You are not going to break up 12 inch specimens with a tiny little hammer. If you can only break up 2 inch specimens, you are only going to bring home 2 inch specimens.
|
| Estwing prybar and crack hammer, the most essential items for every mineral collector. Note the orange paint that helps in spotting these tools at the end of the collecting day. |
The Estwing pry bar is a lightweight 22 inch long prybar with a point at one end. It has so many uses I cannot go into them all. Suffice it to say, this is the single most important tool to own.
I do wish they would make a larger version of the prybar, perhaps 30" long. And it does not replace other crowbars (You should have a 48 or 60" bar if you are attacking heavy work). But when dismantling boulders, searching dumps, breaking up specimens the Estwing prybar is a great tool.
Finding your way in the woods is important. You must be able to return to your car at the end of the day and return to your collecting site again in the future. Everyone is rushing out and spending $200 on portable GPS units so they will never get lost again. But the inherent inaccuracy, as a result of government "selective availability" the signal, often makes the GPS ineffective for mineral collectors. Most common GPS receivers are accurate to 100 meters (though the latest and more expensive DGPS greatly improves accuracy ). That is OK. But I remember searching for the GE Pollucite Quarry in Buckfield, Maine in the old days before it was rediscovered. I was within 40 feet of it and still did not see it until I almost fell into the workings.
And because the GPS signal is line of site, using a GPS in mountainous country or under tree cover, satellites low to the horizon cannot be picked up. These widely spaced satellites yield the maximum triangulation and therefore accuracy when determining position. The GPS is even more inaccurate if you can’t receive their signals.
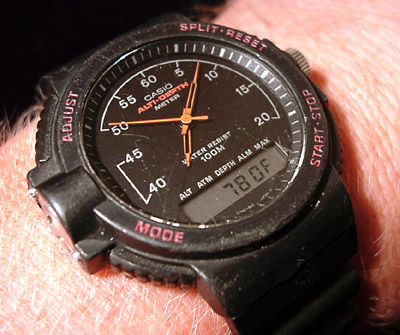
That is where the altimeter watch comes in. It is just like a regular watch, but has an LCD display for your altitude. These are basically quartz, battery powered watches with a small pressure sensor included. The pressure sensor can determine barometric pressure for weather forecasting, depth when snorkeling, or altitude when in the mountains.
|
| Casio altimeter watch. Small LCD display at the bottom of the dial displays altitude in 20 foot increments. |
My old Casio watch is accurate to within 20 feet, equal to the mechanical barometric altimeters that cost twice as much. The newest generation of altimeter watches are accurate to 3 feet. This increased accuracy costs more though.
Once you have found a location you want to return to, you take an altitude reading. Then use a bearing compass to site off a distant landmark. Upon returning to the location you hike up to the recorded altitude and traverse sideways maintaining constant altitude until you cross the site. If you need a reference where your goal is, you can take a bearing with you compass from the same landmark to check progress. It is very easy and accurate. I have used this technique many times and always come back to the desired spot exactly.
One word of caution, any battery powered device can fail. Murphy’s law says it will fail at the most critical moment, just when needed most. My Casio watch battery ran out when I was deep in the woods. Having a regular (mechanical) altimeter would have come in handy. When I returned home, I found that there was no way to change batteries myself - I had to send it in for service ($40). Fortunately the first battery lasted 5 years. And I am sure the new generations of these products have user-serviceable batteries. If you get one, make sure you carry an extra battery.
| Many visitors have asked about where a good altimeter can be purchased.
The barometric (non-battery powered) versions for hikers cost about $300.
Too expensive for casual collectors. And most catalogs list expensive digital
watches with altimeters in them for around $200. Still pricey.
Good New! WWW.WALMART.COM sells the Casio Forester watch (Walmart Item #0007976770047) with built in altimeter for $69.93. I just bought one to replace my old altimeter watch. It is an excellent choice for mineral collectors. It is accurate to 20' elevation, which is as accurate as the expensive barometric models. And the watch arrived in the mail in less than a week. Of course, I still recommend having the expensive barometric altimeter if you are a serious collector. After my altimeter watch conked out when the battery went dead, while I was up a mountain, I have always had a backup. John Betts 8/7/01 |
Most collectors start out carrying their tools in a bucket. This usually works well until the day they have to hike up a long trail. Or the day they hit it big and must carry out 60 pounds of rock, plus the tools they brought with them. Then they say never again and buy a rucksack, the small backpacks used by students for carrying their books to school. This also works adequately until they have a similar trip and must carry a lot of weight. Either the rucksack straps will break or even worse, they don’t break and they must bear the entire weight on their shoulders. Either way they regret the selection of rucksack.
The best way to carry your tools into a site (and your rocks out of a site) is with an internal frame backpack. Why is this different from a rucksack? Because the weight is transferred through the frame to the padded waist strap that bears the weight on the hips. Try it once, and you will never go back. Very little weight is carried by the shoulders. It is all on the hips, which is a big, solid bone and does not fatigue like muscles do.
When buying a backpack, I recommend you have it adjusted to your body at the store (make sure you buy from an experienced store, like EMS or LL Bean). Also if you are going to be bushwhacking off trail, I recommend a pack without side pockets or at least not wider than your body. This is so you can squeeze through narrow saplings without hanging up. Properly adjusted and packed you will find you can hike in and out of a location and it will actually be enjoyable.
You can still take along a bucket, but pack it inside you backpack as reinforcement and to keep your tools from puncturing the fabric. Then, if you collect so many specimens that you don’t have room in the backpack, you can remove the bucket and fill it up and carry it by hand. In these situations it is best to fill the bucket with bulky, lightweight items and pack the heavy items in you backpack.
During hiking and digging sweat soaks cotton clothing. The sweat doesn’t evaporate, leading to overheating. But in practical terms, it just feels awful to digs rocks in sweat-soaked clothing.
The new CoolMax fabric made by DuPont is a unique weave of polypropylene fiber that wicks away perspiration and never gets soggy. Never. This new fabric is available in T-shirts and underwear from LL Bean. I have worked in 95 degree humid weather, sweating like a pig, and the CoolMax T-shirt wicked the sweat away keeping me cool without ever clinging to my body. Very refreshing compared to cotton T-shirts.
More information about CoolMax fabric can be found at www.dupont.com/coolmax or call 1-800-342-3774.
At a collecting site, mosquitoes are often a problem, especially if there is standing water nearby where they can breed. You may be familiar with the little Citronella coils that are used at picnics or out on the deck at night. The same Citronella is available in a candle in a small galvanized pail. There is a small one about the size of a coffee cup and a larger version is about a quart. I recommend you get the largest one that you can comfortably carry in your pack.
Simply pack it in your bag, then light it when you arrive at your site. It is very effective at keeping insects away. In fact, it is so effective, you should be sure not to extinguish it at the end of the day until the last thing. Otherwise the mosquitoes will attack while you are packing up.
Collecting minerals relies on you spotting that great specimen, half covered with dirt, from the tons of material exposed at a dump or in a dig. Your eyesight needs every help you can provide. Besides making sure you have prescription glasses if you need them, you should also use polarized sunglasses. Polarized lenses reduce the reflections of surfaces allowing you to see the true color beneath. Fishermen have used Polarized sunglasses for seeing into water. This same principle works with mineral collecting. Even if you are collecting in the shade the polarized lenses will reduce glare off reflecting rocks. They are most useful when digging on a mine dump where tons of broken rock must be searched.
Two other hints: First, don’t wear clothes the same color as the mineral you are looking for. If you are looking for blue beryl crystals you do not want to wear a blue shirt. Otherwise the color will reflect off miscellaneous mica material and you will be seeing blue everywhere. The second tip: add "blinders" to the sides of your sunglasses. This decreases side glare and greatly improves your vision. It also helps you ignore the other collector that is moving in next to you…
There are two schools of thought when it comes to chisels: get the cheapest one because you are going to break it or loose it, or get the best and hardest chisel you can find to make breaking rock easier. I am in the latter group.
I recommend using carbide-tipped chisels. These are used in the stone carving and quarrying industry and are meant for heavy-duty jobs. Carbide-tipped chisels are the same size as regular chisels, but they have a section of carbide welded into the tip. As a result they are more expensive that forged chisels.
Carbide-tipped hand points and hand chisels are available from Trow & Holden in Barre, Vermont (1-800-451-4349) and Tamco (formerly Bicknell) in Monongahela, Pennsylvania (1-800-826-2672). Their prices are similar. Expect to pay $46-49 for a hand chisel and $50 to 53 for a hand point. Wade Tools in Georgia have carbide-tipped chisels online.
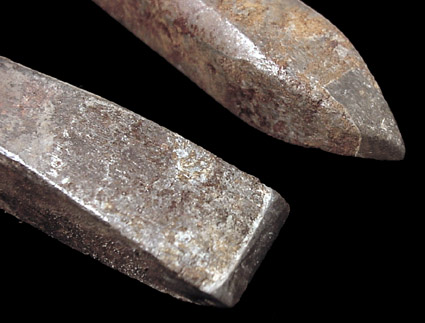
There are two types of these tools available: hand points and hand chisels. A hand chisel is just what you expect, the end narrows down into a straight, thin edge. This tool is used to break a rock along a line in a controlled manner. However the force of the hammer blow is spread out over an elongated area, decreasing the effectiveness. A hand point is tapered at the end in all directions down to a very sharp point. This concentrates all of the hammer blow onto one spot. I have never met a rock that can resist a carbide-tipped hand point.
|
| Carbide tip hand point and hand chisel. The tip has an insert of very hard carbide material. You should keep your tips sharpened better than mine... |
Carbide is very hard, but it is also brittle. You must resist any temptation to use these chisels as a prying tool. The carbide will break off. Fortunately you can have the carbide tip replaced by the manufacturer. This is much less expensive than replacing the entire chisel.
Whatever chisel you use, make sure you keep it sharp. This will greatly increase the efficiency of the chisel, and that means less work for you. The carbide is very hard though, and this makes sharpening more difficult. It pays to have them professionally sharpened. Both Trow & Holden and Tamco offer redressing services.
Learn from my mistakes with these expensive tools. I lost my first carbide-tipped chisel on my first trip out with it. It was the same dull gray color as the rock I was breaking up. At the end of the day I didn’t see it as I departed. Now I paint all of my tools with fluorescent orange spray paint to prevent future oversights.
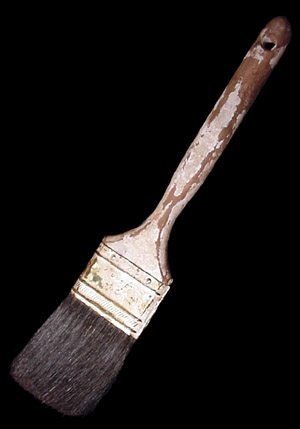
You should always carry an old, stiff paintbrush to brush clean specimens. When digging in old mine dumps, specimens are often covered with dirt or sand. Use the brush to expose the specimen and inspect it for unique minerals. Don Swenson, a very prolific field collector from New Hampshire, showed me a beautiful grossular garnet on vesuvianite that he collected in Sanford, Maine. The previous collectors had overlooked the specimen and discarded it. He brushed off the dirt to find a real killer mineral specimen underneath.
|
| Old stiff bristle brush for wiping away sand and dirt from specimens. |
The brush is also handy when working hard rock. If you are chipping away at the surrounding matrix to expose a crystal, you will generate a lot of dust and chips. Use the brush to keep your working area clean and avoid damaging any overlooked crystals in the process
When I first started collecting Herkimer Diamonds, the old timers kept advising me to cut down the handle of my sledge hammer to about 18" long. I could not fathom the logic. It seemed to me that a longer handle meant a harder swing, harder impact and less work. I ignored them. Until the fateful day when a large boulder rolled down on my sledge hammer, breaking the handle in half. I sawed the break clean and gave it a try. The old timers were right.
I am not sure what makes a short handle so much better than a long handle. I suspect it is a combination of a lot of things: increased accuracy, more versatile at odd angles, easier to lift into swinging position, etc. But the bottom line is, a short 18" sledge hammer handle is essential for collecting minerals.
I know some will ask how heavy a hammer should I buy. If you are strong enough and are going to be working hard rock, then a 16 pound sledge hammer is best. I use a 12 pound sledge hammer most of the time. If a 12 pound hammer is too heavy for you, don’t waist your money on an 8 or 10 pound hammer, buy a short handle heavy masons hammer in 6 or 8 pound weights. They are easiest to use, less expensive and more practical.
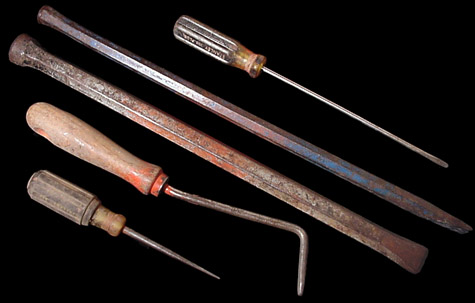
If you ever are lucky enough to open up a new pocket filled with minerals you will find a long 12 or 18 inch screwdriver the best tools for extracting specimens. Every experienced collector has one. Some prefer ice picks, or coat hangers, or plastic tools. But you will need a tool for prying loose and retrieving crystals from deep inside the pocket. A long screwdriver is a good start. If you don’t have one of these long pocket tools you will end up with cuts all over your hand from reaching deep inside a crystal-lined pocket and you will inevitably leave behind some crystals that you couldn’t extract with just your fingers.
|
| An assotment of long tools for extracting crystals from deep inside pockets. Top to bottom: long screwdriver, two long chisels, a modified garden "claw", and an ice pick. |
Maker sure to buy quality tools, preferably with the steel tool part extending all the way through the handle, This will allow you to hammer on the handle end like a chisel without breaking the handle off. Also make sure it is constructed of a good, hardened steel. I have seen some screwdrivers that are too soft for extracting screws, let alone minerals.
|
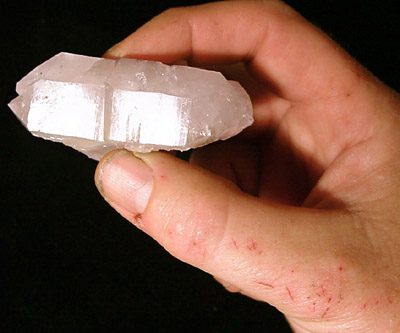
| Quartz crystal from a pocket excavated during the writing of this article. Note the cuts on my hand from reaching inside a pocket lined with crystals - I left my pocket tools home by accident that day. |
Every once in a while you are confronted with a crystal specimen in broad rock face and no hope of extracting the specimen without damage. Or you may need to drive a wedge and no matter how close you look there isn’t a seam or crack with four feet of where you are working.
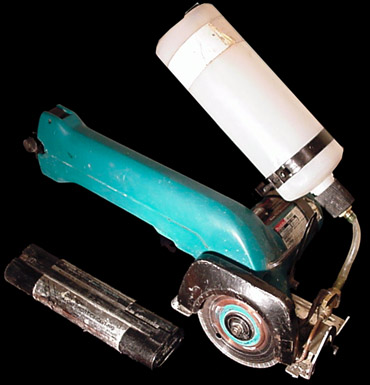
The best tool in these situations is a portable, battery-powered diamond saw made by Makita. It uses rechargeable battery packs to drive a small diamond blade and has a water bottle and water feed for cooling the blade. It makes a cut about one inch deep and is easily hand-held on any position.
|
Makita battery powered diamond saw. This tool is made for cutting tile. But it may be the best tool for extracing hard to collect mineral specimens. |
Make a few cuts around that crystal, use a few small wedges and there is a good chance at getting that specimen out.
One word of warning, it is not meant for continuous use. You cannot make a 3 foot long continuous cut. The motor will overheat and burn out or melt the plastic housing. (I am on my third motor and my second set of housings.) In use you should make a series of short cuts, and monitor the temperature to prevent the housing from overheating.
In spite of these draw backs, when you want to extract that unextractable specimen, this is a good tool to have available.
This list is derived from experiences field collecting. Not everyone will need all of the above items. But if the scenarios described sound like the situations you are encountering, then you certainly should think about getting the items recommended. It should make field collecting minerals easier and more enjoyable.
And now know what a geologist’s pick is for.
If you have a favorite tool or "secret weapon" for field collecting, I would love to hear it. Please email me at jhbnyc@aol.com and share you secret with me.

Please support our sponsor

© John H. Betts - All Rights Reserved